Tuesday, 15 September 2015
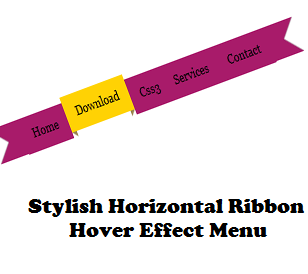
HORIZONTAL STYLISH RIBBON HOVER MENU

Horizontal
Menu is one of very important part of any blog and if menu is giving a
good and better sound then whole blog looks very good and also feel like
a professional blog for everyone. This Ribbon menu is totally made by
CSS3 without any javascript and without any image and this is a pure
CSS3 menu then there will not be any problem to installing it in
blogger. It's hover effect is also very beautiful with mouse. Today
watch this new menu bar tutorial and give us basic help shuld how ne
stylish and animate version menu bar here moddern ribbon different style
here CSS3 HTML.
ADD CSS3 RIBBON STYLE MENU
- Login to Blogger > Dashborad
- Click on Drop Down Menu and select Layout
- Add a HTML/JavaScript Gadget
- Paste below code in it.
<style>
.wg-ribmenu span {
background:#A81B6A;
display:inline-block;
font-family:verdana;
line-height:3em;
padding:0 1em;
margin-top:0.5em;
position:relative;
-webkit-transition: background-color 0.2s, margin-top 0.2s; /* Saf3.2+, Chrome */
-moz-transition: background-color 0.2s, margin-top 0.2s; /* FF4+ */
-ms-transition: background-color 0.2s, margin-top 0.2s; /* IE10 */
-o-transition: background-color 0.2s, margin-top 0.2s; /* Opera 10.5+ */
transition: background-color 0.2s, margin-top 0.2s;
}
.wg-ribmenu a:hover span {
background:#FFD204;
margin-top:0;
}
.wg-ribmenu span:before {
content: "";
position:absolute;
top:3em;
left:0;
border-right:0.5em solid #9B8651;
border-bottom:0.5em solid #fff;
}
.wg-ribmenu span:after {
content: "";
position:absolute;
top:3em;
right:0;
border-left:0.5em solid #9B8651;
border-bottom:0.5em solid #fff;
}
.wg-ribmenu a:link, .wg-ribmenu a:visited {
color:#000;
text-decoration:none;
float:left;
height:3.5em;
overflow:hidden;
}
.wg-ribmenu:after, .wg-ribmenu:before {
margin-top:0.5em;
content: "";
float:left;
border: 1.5em solid #A81B6A;
}
.wg-ribmenu:after {
border-right-color:transparent;
}
.wg-ribmenu:before {
border-left-color:transparent;
}
</style>
<div class='wg-ribmenu'>
<a href='#'><span>Home</span></a>
<a href='#'><span>Widget</span></a>
<a href='#'><span>Hacks</span></a>
<a href='#'><span>jQuery</span></a>
<a href='#'><span>Sitemap</span></a>
<a href='#'><span>News</span></a>
<a href='http://www.widgetgenerators.blogspot.com/'><span>FAQ's</span></a>
</div>
- Save your widget and you are done.
MAKE CHANGES....!
- Replace it # with your link.
- Replace it Orange color with your own tab name.
Subscribe to:
Post Comments
(
Atom
)

No comments :
Post a Comment